
Extended-Connectivity Fingerprints(ECFPs) are a type of molecular fingerprint explicitly designed to capture molecular features relevant to molecular activity. They are among the most popular similarity search tools in drug discovery and they are effectively used in a wide variety of applications.
ECFP Generation Process
There are four steps involved in generating ECFP features for a molecule. First, we’ll explain them briefly by using the example of Benzamide and then go into details in a later part.
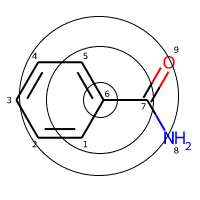
This is a Benzamide molecule with atoms marked with a number for reference and let’s say that we’re trying to featurize the atom number 6.

Step 1 - Initial Stage: First, each atom in the molecule is assigned a unique integer identifier. This identifier is generated by hashing a combination of properties like atomic numbers, atomic mass, etc. More on this later.
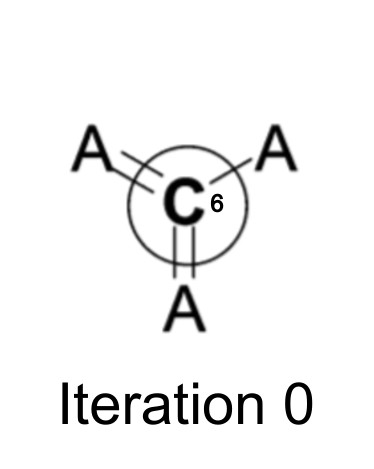 At the beginning, the initial atom identifier only represents information about the atom itself and its attached bonds.
Step 2 - Update Stage: Next, each atom collects its identifier and the identifiers of its immediately neighboring atoms, into an array. A hash function is applied to reduce this array back into a new, single-integer identifier. This step is done to capture the neighborhood of the atom(an atom’s behavior is also influenced by the type of atoms that surrounds it).
Once all atoms have generated their new identifiers, the old identifiers are replaced with the new ones. This updating process is done multiple times iteratively: In the initial iteration, capturing individual atomic properties, the next iteration, accounting for its neighbors, the next one, neighbors of neighbors, and so on. The choice of the number of iterations is left to the user.
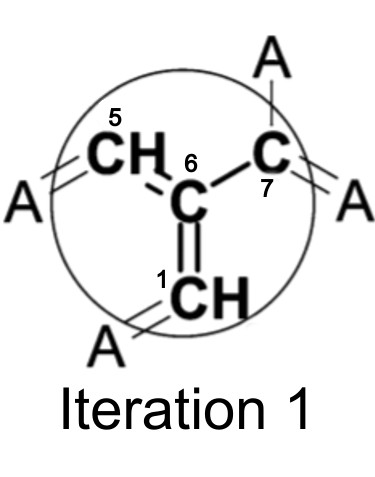 After one iteration, the identifier now contains information about atom 6′s immediate neighbors.
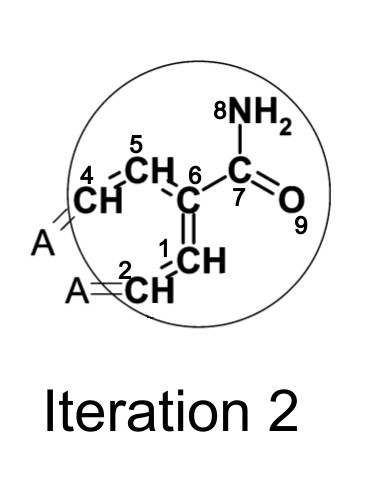 After two iterations, the identifier now contains information about atom 6′s neighbors’ neighbors.
Step 3 - De-duplication Stage: The third stage removes the duplicate features from our generated feature list. This is best explained with a proper example so we’ll explain this in detail later.
Step 4 - Forming the bit array: Once all the identifiers are calculated for a specified number of iterations, the final step is to reduce these identifiers into a bit array. This will be best explained with an example later.
NOTE: This process is repeated for all the atoms in the molecule not just for the one atom I have shown (atom no. 6). One by one, each atom is chosen as a center and then the same process is repeated. Once the whole process is completed, each atom will have an identifier that will contain substructural information from all parts of the molecule.
Now, let’s jump into each step in more detail. We’ll take another molecule called Butyramide to explain this part. Atoms are once again numbered for reference.

Step 1 - Assigning an integer identifier to each atom
As we have mentioned before, the first step is to assign an identifier to an atom. So how do we come up with these integers? These are calculated using the Daylight atomic invariants rule. As the name states, these rules are independent of the number assigned to the atom (Remember that atom no. 6? We could easily have called it atom no. 1 and the identifier shouldn’t change in such cases).
The Daylight atomic invariants are six properties of an atom in a molecule. These properties are:
- Number of non-hydrogen immediate neighbors
- Valency minus the number of connected hydrogens (in other words, total bond order ignoring bonds to hydrogens)
- Atomic number
- Atomic mass
- Atomic charge
- Number of attached hydrogens (both implicit and explicit)
There’s an additional seventh property often used in the ECFP features:
- Whether the atom is a part of at least one ring(1, if yes, 0 otherwise)
These features are then converted to an integer value using a hashing function. This hashed value is nothing but the initial identifier for the atoms.
NOTE: Most programming languages have their in-built hashing functions. For example, in Python, you can simply call the hash() function to hash any string or object.
Let’s try this out for our atom no. 4 in our new molecule Butyramide and calculate the identifier. First, let’s calculate all seven properties:
- Number of non-hydrogen immediate neighbors = 3 (atom 3, 5, and 6)
- Valency minus the number of connected hydrogens = 4 (4 - 0)
- Atomic number = 6
- Atomic mass = 12
- Atomic charge = 0
- Number of attached hydrogens = 0
- Is it a part of a ring = 0 (no)
So, f4 = (3, 4, 6, 12, 0, 0, 0)
Now, hashing this tuple in python:
identifier = hash((3, 4, 6, 12, 0, 0, 0))
print(identifier)
# -2155244659601281804
Thus we get the identifier for atom 6 after initial iteration: -2155244659601281804. Similarly, this process is repeated for each of the atoms, and identifiers are calculated. The feature set after the initial iteration will look like this:
1: -4080868480043360372
2:  8311098529014133067
3:  8311098529014133067
4: -2155244659601281804
5: -3602994677767288312
6:  8573586092015465947
Step 2 - Iteratively updating the atom identifiers
The next step is updating these identifiers to include information about the neighborhood of the atoms. The following process is followed to achieve that:
- First, an array is initialized containing the iteration number and the initial identifier of the atom in question. For example, for the first iteration of atom no. 4 in Butyramide, the array will be:
[(1, -2155244659601281804)] -
Next, we add two more numbers to this array for each non-hydrogen neighbor. The first of these numbers is the bond order with that particular atom and the second is that atom’s current identifier. Values 1, 2, 3, and 4 are used for single, double, triple, and aromatic bonds, respectively. Further, to avoid any ordering dependency in this attachment list, the attachments are sorted using their number pairs.
For example, atom 4 is connected to 5, 3, and 6 with a single, single and double bond, respectively. The feature array will now become:
[(1, -2155244659601281804), (1, -3602994677767288312), (1, 8311098529014133067), (2, 8573586092015465947)]This is further converted to a proper list as below:
[1, -2155244659601281804, 1, -3602994677767288312, 1, 8311098529014133067, 2, 8573586092015465947] - Same as before, this list is hashed using a hash function to get an updated integer identifier. For atom 4, the value will be
3790237506519639747.identifier_updated = hash(tuple([1, -2155244659601281804, 1, -3602994677767288312, 1, 8311098529014133067, 2, 8573586092015465947])) print(identifier_updated) # 3790237506519639747 - This process is repeated for all atoms for a prespecified number of iterations. the updated values after first iteration will be:
1: -3879702859024654160
2:  2648074263463118673
3:  9209025387859845960
4:  3790237506519639747
5: -8399737669368778010
6:  3271801898087186516
NOTE: Notice how the atom 2 and 3 have the same identifier after initial iteration but it changes after the first iteration. Think why?
This is because the atoms are identical when we just look at them individually but becomes different when looking at their environment (Atom 2 is connected to a -CH3 group while atom 3 is connected to a -C(=O)NH2 group).
-
Similarly, for the second iteration, we’ll do the exact same thing but this time we’ll use the updated identifiers. To say it differently, we used identifiers from initial iteration to get values for the first iteration. The same way, we’ll use the identifiers from first iteration to get values for the second iteration.
- After each iteration, the identifiers are added to a feature list created from the previous iteration. For example, after the initialization step, we got 6 identifiers to our feature list. After the next iteration, we’ll have six more identifiers added to the feature list. So, after the initial and first iteration, our feature list will become:
[-4080868480043360372, 8311098529014133067, 8311098529014133067, -2155244659601281804, -3602994677767288312, 8573586092015465947, -3879702859024654160, 2648074263463118673, 9209025387859845960, 3790237506519639747, -8399737669368778010, 3271801898087186516]and after a total of two iterations, it’ll be
[-4080868480043360372, 8311098529014133067, 8311098529014133067, -2155244659601281804, -3602994677767288312, 8573586092015465947, -3879702859024654160, 2648074263463118673, 9209025387859845960, 3790237506519639747, -8399737669368778010, 3271801898087186516, 7820245418060671737, -8234949431280515543, -5902629546112570760, -3660103599533977242, -5964710996914813053, 8916398073441202914]
Step 3 - Removing duplicate structures
When we increase the number of iterations, multiple atoms may end up generating the same substructure. Like we saw earlier for atoms 2 and 3 at the initial iteration, the generated identifiers were the same. This third and final stage is concerned with removing these duplicates. In the case of 2 and 3, anyone can be dropped.
But what if the identifiers are not the same but the substructures are duplicates? Let’s take an example: After 2 iterations, when we take Oxygen as the center and then Nitrogen as the center, the same substructure is generated.

Here, after two iterations, the identifiers generated for Oxygen and Nitrogen are -5964710996914813053 and 8916398073441202914 respectively. And these are different, which is expected since the regions started at different atoms. So how do we deduplicate them?
To identify such duplicates, each identifier keeps track of the set of bonds that it represents in a particular molecule. At each iteration step, the set of bonds is updated to include:
- the union of all bonds in the central atom’s bond set from the previous iteration
- the neighbor atom’s bond sets from the previous iteration, and
- all attachment bonds
This list of bonds effectively defines the substructure within the molecule that is covered by the newly generated feature. Before the newly generated features from an iteration are appended to the fingerprint set, they are checked to see if any structural duplicates exist to either previously generated features or newly discovered features.
So, after removing such duplicates, our fingerprint set will finally be:
[-4080868480043360372, 8311098529014133067, -2155244659601281804, -3602994677767288312, 8573586092015465947, -3879702859024654160, 2648074263463118673, 9209025387859845960, 3790237506519639747, -8399737669368778010, 3271801898087186516, -8234949431280515543, -5902629546112570760, -3660103599533977242]
Step 4 - Converting the identifiers to a bit array
Now, the last step that’s left is to convert these identifiers into a computer-usable bit array. The steps for this part are straightforward:
- First, the user has to choose the length of the fingerprint array. Traditionally, a length of 1024 is used.
- Once the length is decided, we initialize a zero-array of the decided length.
import numpy as np fp = np.zeros(1024) print(fp) # array([0., 0., 0., ..., 0., 0., 0.]) - Now, divide each identifier with the array length (1024) and calculate the remainder. In programming languages like Python, it can be achieved by using the
%operator. e.g.-4080868480043360372 % 1024=908. Similarly, calculate the reminder for all the identifiers.remainders = [908, 331, 244, 520, 475, 176, 849, 840, 707, 742, 84, 553, 632, 358] - Lastly, set the values in the bit array to one at the indices equal to the remainders. In other words, set the values to 1 in the positions 908, 331, …, 358.
for x in remainders:
 fp[x] = 1
print(fp)
# [0, 0, 0, 0, 0, 0, 0, 0, 0, 0, 0, 0, 0, 0, 0, 0, 0, 0, 0, 0, 0, 0, 0, 0, 0, 0, 0, 0, 0, 0, 0, 0, 0, 0, 0, 0, 0, 0, 0, 0, 0, 0, 0, 0, 0, 0, 0, 0, 0, 0, 0, 0, 0, 0, 0, 0, 0, 0, 0, 0, 0, 0, 0, 0, 0, 0, 0, 0, 0, 0, 0, 0, 0, 0, 0, 0, 0, 0, 0, 0, 0, 0, 0, 0, 1, 0, 0, 0, 0, 0, 0, 0, 0, 0, 0, 0, 0, 0, 0, 0, 0, 0, 0, 0, 0, 0, 0, 0, 0, 0, 0, 0, 0, 0, 0, 0, 0, 0, 0, 0, 0, 0, 0, 0, 0, 0, 0, 0, 0, 0, 0, 0, 0, 0, 0, 0, 0, 0, 0, 0, 0, 0, 0, 0, 0, 0, 0, 0, 0, 0, 0, 0, 0, 0, 0, 0, 0, 0, 0, 0, 0, 0, 0, 0, 0, 0, 0, 0, 0, 0, 0, 0, 0, 0, 0, 0, 1, 0, 0, 0, 0, 0, 0, 0, 0, 0, 0, 0, 0, 0, 0, 0, 0, 0, 0, 0, 0, 0, 0, 0, 0, 0, 0, 0, 0, 0, 0, 0, 0, 0, 0, 0, 0, 0, 0, 0, 0, 0, 0, 0, 0, 0, 0, 0, 0, 0, 0, 0, 0, 0, 0, 0, 0, 0, 0, 0, 0, 0, 0, 0, 0, 0, 0, 0, 1, 0, 0, 0, 0, 0, 0, 0, 0, 0, 0, 0, 0, 0, 0, 0, 0, 0, 0, 0, 0, 0, 0, 0, 0, 0, 0, 0, 0, 0, 0, 0, 0, 0, 0, 0, 0, 0, 0, 0, 0, 0, 0, 0, 0, 0, 0, 0, 0, 0, 0, 0, 0, 0, 0, 0, 0, 0, 0, 0, 0, 0, 0, 0, 0, 0, 0, 0, 0, 0, 0, 0, 0, 0, 0, 0, 0, 0, 0, 0, 0, 0, 0, 0, 0, 0, 0, 1, 0, 0, 0, 0, 0, 0, 0, 0, 0, 0, 0, 0, 0, 0, 0, 0, 0, 0, 0, 0, 0, 0, 0, 0, 0, 0, 1, 0, 0, 0, 0, 0, 0, 0, 0, 0, 0, 0, 0, 0, 0, 0, 0, 0, 0, 0, 0, 0, 0, 0, 0, 0, 0, 0, 0, 0, 0, 0, 0, 0, 0, 0, 0, 0, 0, 0, 0, 0, 0, 0, 0, 0, 0, 0, 0, 0, 0, 0, 0, 0, 0, 0, 0, 0, 0, 0, 0, 0, 0, 0, 0, 0, 0, 0, 0, 0, 0, 0, 0, 0, 0, 0, 0, 0, 0, 0, 0, 0, 0, 0, 0, 0, 0, 0, 0, 0, 0, 0, 0, 0, 0, 0, 0, 0, 0, 0, 0, 0, 0, 0, 0, 0, 0, 0, 0, 0, 0, 0, 0, 0, 0, 0, 0, 1, 0, 0, 0, 0, 0, 0, 0, 0, 0, 0, 0, 0, 0, 0, 0, 0, 0, 0, 0, 0, 0, 0, 0, 0, 0, 0, 0, 0, 0, 0, 0, 0, 0, 0, 0, 0, 0, 0, 0, 0, 0, 0, 0, 0, 1, 0, 0, 0, 0, 0, 0, 0, 0, 0, 0, 0, 0, 0, 0, 0, 0, 0, 0, 0, 0, 0, 0, 0, 0, 0, 0, 0, 0, 0, 0, 0, 0, 1, 0, 0, 0, 0, 0, 0, 0, 0, 0, 0, 0, 0, 0, 0, 0, 0, 0, 0, 0, 0, 0, 0, 0, 0, 0, 0, 0, 0, 0, 0, 0, 0, 0, 0, 0, 0, 0, 0, 0, 0, 0, 0, 0, 0, 0, 0, 0, 0, 0, 0, 0, 0, 0, 0, 0, 0, 0, 0, 0, 0, 0, 0, 0, 0, 0, 0, 0, 0, 0, 0, 0, 0, 0, 0, 0, 0, 0, 0, 1, 0, 0, 0, 0, 0, 0, 0, 0, 0, 0, 0, 0, 0, 0, 0, 0, 0, 0, 0, 0, 0, 0, 0, 0, 0, 0, 0, 0, 0, 0, 0, 0, 0, 0, 0, 0, 0, 0, 0, 0, 0, 0, 0, 0, 0, 0, 0, 0, 0, 0, 0, 0, 0, 0, 0, 0, 0, 0, 0, 0, 0, 0, 0, 0, 0, 0, 0, 0, 0, 0, 0, 0, 0, 0, 1, 0, 0, 0, 0, 0, 0, 0, 0, 0, 0, 0, 0, 0, 0, 0, 0, 0, 0, 0, 0, 0, 0, 0, 0, 0, 0, 0, 0, 0, 0, 0, 0, 0, 0, 1, 0, 0, 0, 0, 0, 0, 0, 0, 0, 0, 0, 0, 0, 0, 0, 0, 0, 0, 0, 0, 0, 0, 0, 0, 0, 0, 0, 0, 0, 0, 0, 0, 0, 0, 0, 0, 0, 0, 0, 0, 0, 0, 0, 0, 0, 0, 0, 0, 0, 0, 0, 0, 0, 0, 0, 0, 0, 0, 0, 0, 0, 0, 0, 0, 0, 0, 0, 0, 0, 0, 0, 0, 0, 0, 0, 0, 0, 0, 0, 0, 0, 0, 0, 0, 0, 0, 0, 0, 0, 0, 0, 0, 0, 0, 0, 0, 0, 1, 0, 0, 0, 0, 0, 0, 0, 0, 1, 0, 0, 0, 0, 0, 0, 0, 0, 0, 0, 0, 0, 0, 0, 0, 0, 0, 0, 0, 0, 0, 0, 0, 0, 0, 0, 0, 0, 0, 0, 0, 0, 0, 0, 0, 0, 0, 0, 0, 0, 0, 0, 0, 0, 0, 0, 0, 0, 0, 0, 0, 0, 0, 0, 0, 0, 0, 0, 1, 0, 0, 0, 0, 0, 0, 0, 0, 0, 0, 0, 0, 0, 0, 0, 0, 0, 0, 0, 0, 0, 0, 0, 0, 0, 0, 0, 0, 0, 0, 0, 0, 0, 0, 0, 0, 0, 0, 0, 0, 0, 0, 0, 0, 0, 0, 0, 0, 0, 0, 0, 0, 0, 0, 0, 0, 0, 0, 0, 0, 0, 0, 0, 0, 0, 0, 0, 0, 0, 0, 0, 0, 0, 0, 0, 0, 0, 0, 0, 0, 0, 0, 0, 0, 0, 0, 0, 0, 0, 0, 0, 0, 0, 0, 0, 0, 0, 0, 0, 0, 0, 0, 0, 0, 0, 0, 0, 0, 0, 0, 0, 0, 0, 0, 0]
This bit array is our final fingerprint for the molecule.
Intuitive Explanation
Let’s quickly go through the process one more time to understand it intuitively. Think of each identifier as a substructure. The following figure shows the effect of iteration on taking Oxygen as the center.
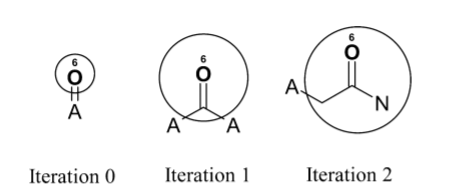 Before the iteration process begins, the feature represented by the initial atom identifier is simply double-bonded oxygen. After one iteration, the identifier represents a carbonyl group. After two iterations, the identifier represents an aliphatic carboxylic acid amide, with no substituents on the nitrogen atom and exactly one substituent on the α-carbon. This shows how even a small number of iterations quickly creates identifiers that represent larger and larger substructures.
What’s the difference between ECFP, ECFP4, and ECFP6?
The appended number is the effective diameter of the largest feature and is equal to twice the number of iterations performed; for example, if two iterations are performed, the largest possible fragment will have a width of 4 bonds, and the fingerprint name will end in “4” (e.g., “ECFP4”). The remainder of the algorithm can be executed without change.
So what about ECFP? Adding a number, in the end, is simply a convention we follow. We can call ECFP4 simply as ECFP with diameter 4.
NOTE: Some literature also uses a _(underscore) to denote the diameter of the largest feature. For example, ECFP4 and ECFP6 are sometimes also written as ECFP_4 and ECFP_6.
Can we use features other than the Daylight invariants rule?
Of course. In the initialization step, you can add any custom features you want to the tuple. In fact, there are many variations of ECFP depending on the properties of the atoms used. For example, Sybyl atom types(called SCFPs, or aLogP atom codes(called LCFPs), etc.
What is a bit collision?
Let’s say you end up with a hash value of -4080868480043360372 in one of the iterations. As we discussed earlier, this value represents some information about the molecule and we convert it to a bit array by calculating its remainder after dividing it by the array length, 1024. In this case, it’s 908. So 908th value in the 1024 long array is set to 1.
Now let’s say, in another iteration, you also get the hash value of -14439656419269748 whose remainder is also 908. Both the values are pointing to the same 908th index of the fingerprint and as a result some information about the molecule is lost. This is called a bit collision.
However, if we increase the array length to be 2048, the remainders will be 908 and 1932, respectively. As a result, it’s avoiding the loss of information. There might still be bit collisions which can be avoided by increasing the fingerprint size further to higher values.
So does that mean the bigger the size of fingerprint the better?
No. There’s a trade-off between information stored vs sparsity in the data. While a longer fingerprint may avoid bit collisions, it also brings more sparsity in the data. Out of the 1024 bits, there are only a few of the bits that are 1’s (3-30 generally). Increasing the size will almost double the number of redundant zeros while it may not even avoid any collision (the collisions are plausible but infrequent). Typically, a 1024 length is sufficient.
Some important points
- Hydrogen atoms and bonds to hydrogen atoms are ignored
- The identifier value depends on the hashing function. So two different hash functions or programming languages might produce different identifiers. The idea is to have a consistent function to hash certain values.
- Number of iterations depends on the desired use of the fingerprint. Typically, two iterations are sufficient for fingerprints that will be used for similarity or clustering, while activity learning methods often benefit from the greater structure detail available after three or even four or more iterations.
Share it on Twitter Facebook LinkedIn